BLE串口透传测试
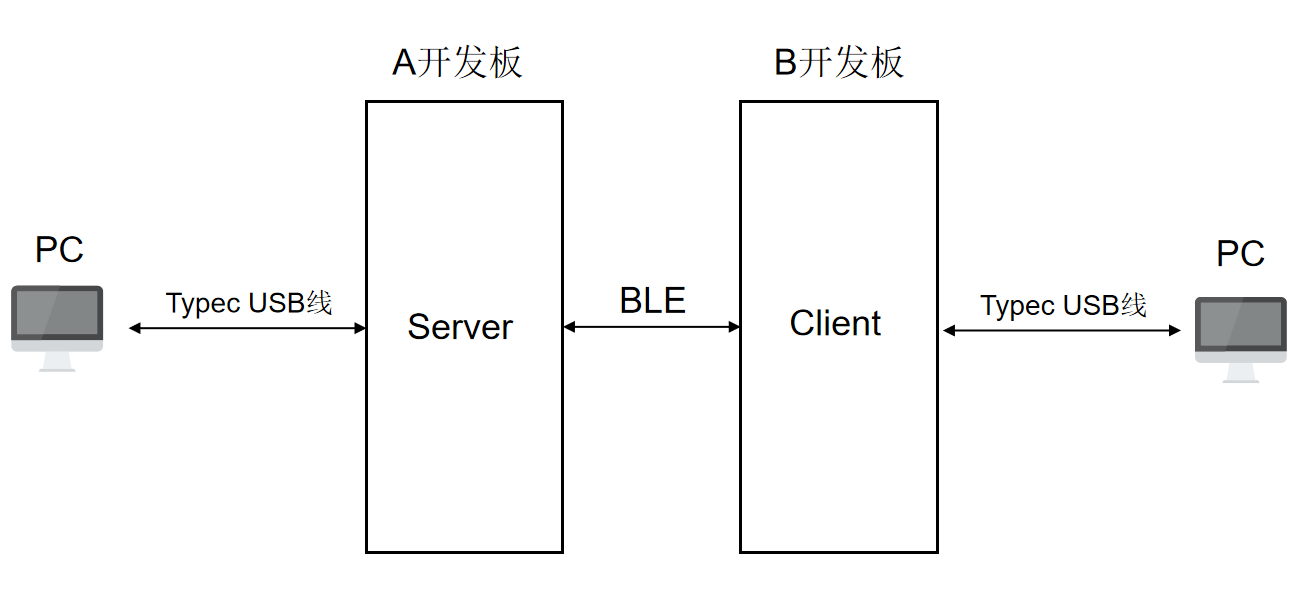
该教程演示如何通过两块开发板实现BLE数据传输测试,A开发板通过串口接收数据,然后通过BLE传输给B开发板,B开发板通过串口将接收到的数据打印出来;同样,B开发板通过串口接收数据,然后通过BLE传输给A开发板,A开发板通过串口将接收到的数据打印出来。在测试中需要一块开发板做为Server端,另外一块开发板做为Client端,两块开发板配对后就可以互发消息了。
一、准备工作
- 准备2块BearPi-Pico H3863开发板
二、编译 BLE UART Server代码
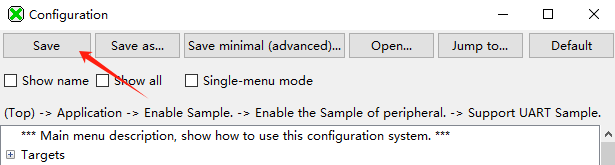
点击工具栏中的“系统配置”,打开配置界面.

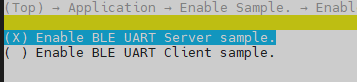
选择Enable BLE UART Server sample
Application  --->
    [*] Enable Sample.
    [ ]     Enable the Sample of peripheral.
    [*]     Enable the Sample of products.
    [ ]         Enable all the sample of product, it's just for build.
    [*]         Support BLE UART sample.
                    BLE UART Sample Configuration  --->
                        Select ble uart type (Enable BLE UART Server sample.)  --->
                                (X) Enable BLE UART Server sample.
                                ( ) Enable BLE UART Client sample.
    [ ]         Support SLE UART sample.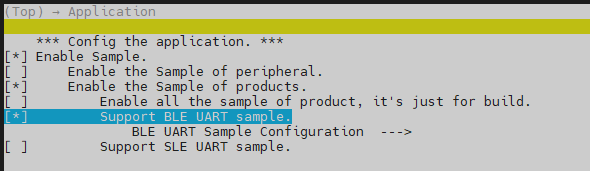
按下"Save"键保存配置。
关键代码,位于
application\samples\products\ble_uart\ble_uart.cstatic void *ble_uart_server_task(const char *arg) { unused(arg); ble_uart_server_init(); //初始化服务端 errcode_t ret = uapi_uart_register_rx_callback(CONFIG_BLE_UART_BUS, //注册uart中断回调 UART_RX_CONDITION_FULL_OR_SUFFICIENT_DATA_OR_IDLE, 1, ble_uart_read_int_handler); if (ret != ERRCODE_SUCC) { osal_printk("Register uart callback fail."); return NULL; } while (1) { msg_data_t msg_data = { 0 }; int msg_ret = osal_msg_queue_read_copy(mouse_msg_queue, &msg_data, &msg_rev_size, OSAL_WAIT_FOREVER); if (msg_ret != OSAL_SUCCESS) { osal_printk("msg queue read copy fail."); if (msg_data.value != NULL) { osal_vfree(msg_data.value); } continue; } if (msg_data.value != NULL) { ble_uart_server_send_input_report(msg_data.value, msg_data.value_len); //向客户端发送数据 osal_vfree(msg_data.value); } } return NULL; }编译烧录固件
参考环境搭建教程编译烧录代码
在MobaXterm中输入:
./build.py menuconfig ws63-liteos-app选择Enable BLE UART Server sample
Application  --->
    [*] Enable Sample.
    [ ]     Enable the Sample of peripheral.
    [*]     Enable the Sample of products.
    [ ]         Enable all the sample of product, it's just for build.
    [*]         Support BLE UART sample.
                    BLE UART Sample Configuration  --->
                        Select ble uart type (Enable BLE UART Server sample.)  --->
                                (X) Enable BLE UART Server sample.
                                ( ) Enable BLE UART Client sample.
    [ ]         Support SLE UART sample.
按下"ESC"键退出并保存配置。
关键代码,位于
application\samples\products\ble_uart\ble_uart.cstatic void *ble_uart_server_task(const char *arg) { unused(arg); ble_uart_server_init(); //初始化服务端 errcode_t ret = uapi_uart_register_rx_callback(CONFIG_BLE_UART_BUS, //注册uart中断回调 UART_RX_CONDITION_FULL_OR_SUFFICIENT_DATA_OR_IDLE, 1, ble_uart_read_int_handler); if (ret != ERRCODE_SUCC) { osal_printk("Register uart callback fail."); return NULL; } while (1) { msg_data_t msg_data = { 0 }; int msg_ret = osal_msg_queue_read_copy(mouse_msg_queue, &msg_data, &msg_rev_size, OSAL_WAIT_FOREVER); if (msg_ret != OSAL_SUCCESS) { osal_printk("msg queue read copy fail."); if (msg_data.value != NULL) { osal_vfree(msg_data.value); } continue; } if (msg_data.value != NULL) { ble_uart_server_send_input_report(msg_data.value, msg_data.value_len); //向客户端发送数据 osal_vfree(msg_data.value); } } return NULL; }编译烧录固件
参考环境搭建教程编译烧录代码
三、编译 BLE UART Client代码
点击工具栏中的“系统配置”,打开配置界面.
选择Enable BLE UART Client sample
Application  --->
    [*] Enable Sample.
    [ ]     Enable the Sample of peripheral.
    [*]     Enable the Sample of products.
    [ ]         Enable all the sample of product, it's just for build.
    [*]         Support BLE UART sample.
                    BLE UART Sample Configuration  --->
                        Select ble uart type (Enable BLE UART Server sample.)  --->
                                ( ) Enable BLE UART Server sample.
                                (X) Enable BLE UART Client sample.
    [ ]         Support SLE UART sample.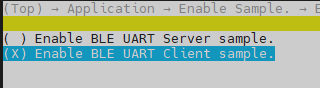
按下"Save"键保存配置。
关键代码,位于
application\samples\products\ble_uart\ble_uart.cstatic void *ble_uart_client_task(const char *arg) { unused(arg); osal_printk("ble_uart_client_task entry."); ble_uart_client_init(); //初始化BLE客户端 errcode_t ret = uapi_uart_register_rx_callback(CONFIG_BLE_UART_BUS, //注册uart中断回调 UART_RX_CONDITION_FULL_OR_SUFFICIENT_DATA_OR_IDLE, 1, ble_uart_read_int_handler); if (ret != ERRCODE_SUCC) { osal_printk("Register uart callback fail."); return NULL; } while (1) { msg_data_t msg_data = { 0 }; int msg_ret = osal_msg_queue_read_copy(mouse_msg_queue, &msg_data, &msg_rev_size, OSAL_WAIT_FOREVER); if (msg_ret != OSAL_SUCCESS) { osal_printk("msg queue read copy fail."); if (msg_data.value != NULL) { osal_vfree(msg_data.value); } continue; } if (msg_data.value != NULL) { uint16_t write_handle = ble_uart_get_write_vlaue_handle(); ble_uart_client_write_cmd(msg_data.value, msg_data.value_len, write_handle);//向服务端发送数据 osal_vfree(msg_data.value); } } return NULL; }编译烧录固件
参考环境搭建教程编译烧录代码
在MobaXterm中输入:
./build.py menuconfig ws63-liteos-app选择Enable BLE UART Client sample
Application  --->
    [*] Enable Sample.
    [ ]     Enable the Sample of peripheral.
    [*]     Enable the Sample of products.
    [ ]         Enable all the sample of product, it's just for build.
    [*]         Support BLE UART sample.
                    BLE UART Sample Configuration  --->
                        Select ble uart type (Enable BLE UART Server sample.)  --->
                                ( ) Enable BLE UART Server sample.
                                (X) Enable BLE UART Client sample.
    [ ]         Support SLE UART sample.
按下"ESC"键退出并保存配置。
关键代码,位于
application\samples\products\ble_uart\ble_uart.cstatic void *ble_uart_client_task(const char *arg) { unused(arg); osal_printk("ble_uart_client_task entry."); ble_uart_client_init(); //初始化BLE客户端 errcode_t ret = uapi_uart_register_rx_callback(CONFIG_BLE_UART_BUS, //注册uart中断回调 UART_RX_CONDITION_FULL_OR_SUFFICIENT_DATA_OR_IDLE, 1, ble_uart_read_int_handler); if (ret != ERRCODE_SUCC) { osal_printk("Register uart callback fail."); return NULL; } while (1) { msg_data_t msg_data = { 0 }; int msg_ret = osal_msg_queue_read_copy(mouse_msg_queue, &msg_data, &msg_rev_size, OSAL_WAIT_FOREVER); if (msg_ret != OSAL_SUCCESS) { osal_printk("msg queue read copy fail."); if (msg_data.value != NULL) { osal_vfree(msg_data.value); } continue; } if (msg_data.value != NULL) { uint16_t write_handle = ble_uart_get_write_vlaue_handle(); ble_uart_client_write_cmd(msg_data.value, msg_data.value_len, write_handle);//向服务端发送数据 osal_vfree(msg_data.value); } } return NULL; }编译烧录固件
参考环境搭建教程编译烧录代码
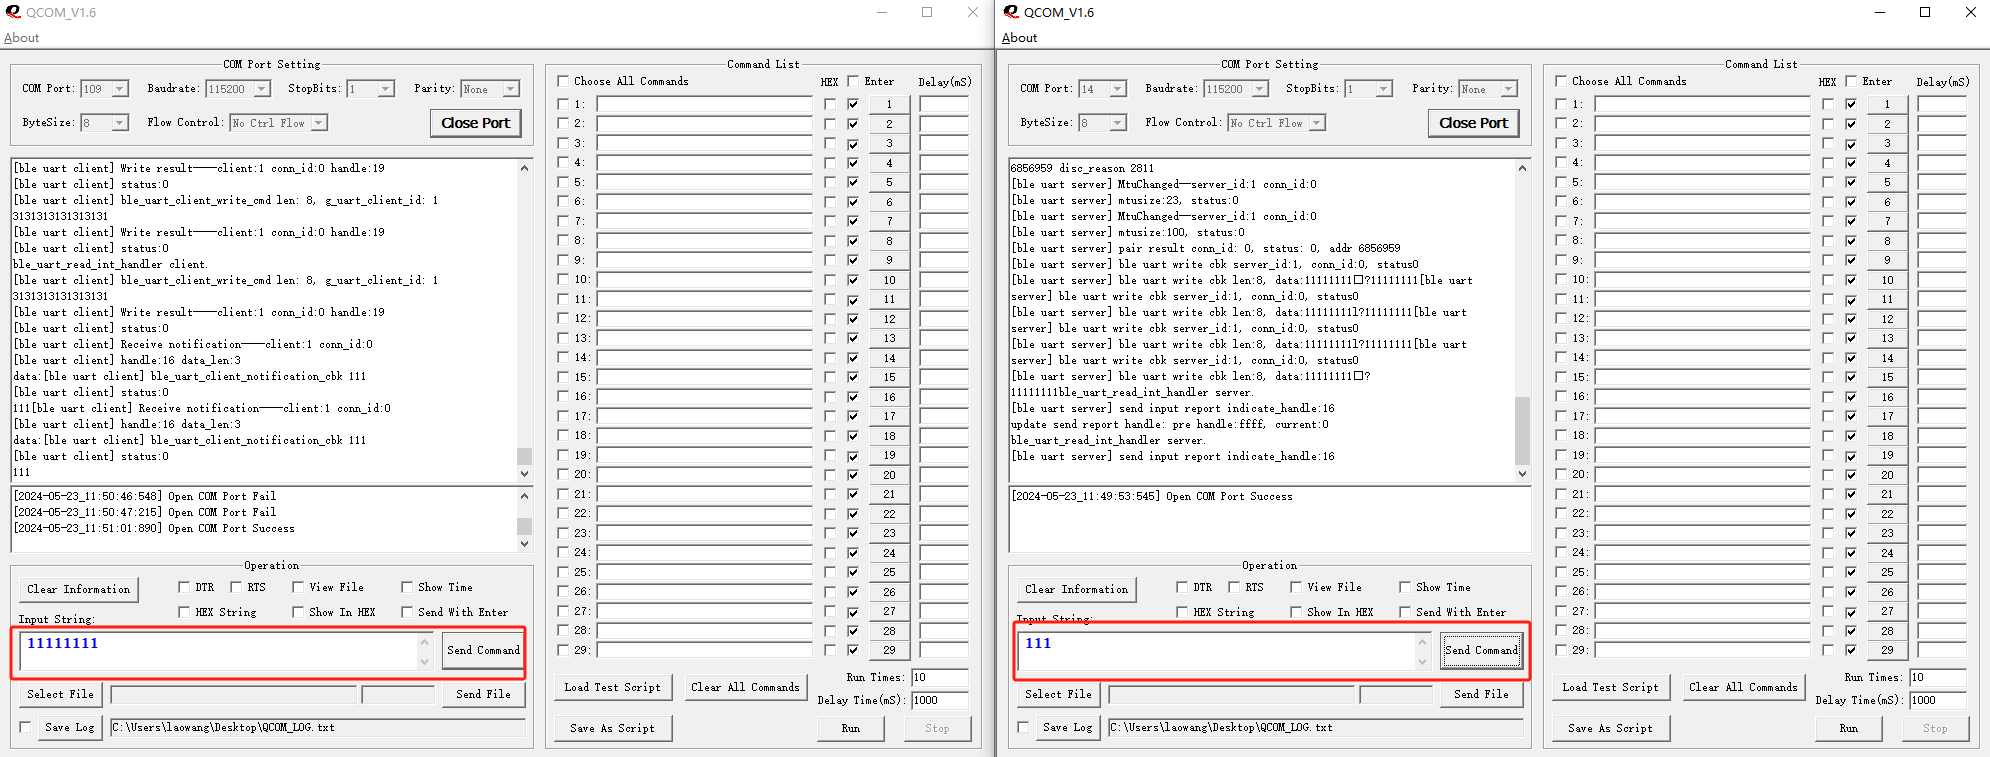
四、测试
烧录固件后先启动server设备,再启动client设备,在串口工具的输入框中输入数据并发送,测试server和client设备之间的数据收发,如下图所示。