
1.GPIO点亮LED灯测试
该教程演示如何通过开发板的GPIO点亮LED灯。
一、准备工作
- 准备1块BearPi-Pico H3863开发板
二、编译代码
在Windows下编译操作
点击工具栏中的“系统配置”,打开配置界面.

选择Support BLINKY Sample
Application  --->
    [*] Enable Sample.
    [*]     Enable the Sample of peripheral.
    [ ]         Enable all the sample of peripheral, it's just for build.
    [ ]         Support ADC Sample.
    [*]         Support BLINKY Sample.
                    BLINK Sample Configuration  --->
设置LED的GPIO和闪烁时间,这边以设置板载LED的GPIO为例。
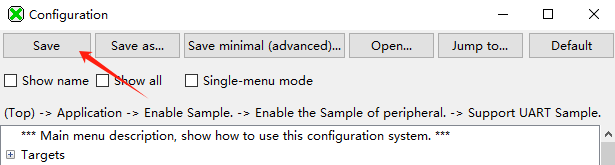
BLINK Sample Configuration  --->
    (2) Choose BLINKY_PIN pin. (NEW)
    (500) Duration of blinky in MS. (NEW)
按下"Save"键保存配置。
关键代码,位于
application\samples\peripheral\blinky\blinky_cmsis.cstatic void *blinky_task(const char *arg) { unused(arg); uapi_pin_set_mode(CONFIG_BLINKY_PIN, HAL_PIO_FUNC_GPIO); //设置引脚复用模式为GPIO uapi_gpio_set_dir(CONFIG_BLINKY_PIN, GPIO_DIRECTION_OUTPUT);//设置GPIO方向为输出方向 uapi_gpio_set_val(CONFIG_BLINKY_PIN, GPIO_LEVEL_LOW); //设置GPIO电平为低电平 while (1) { osal_msleep(CONFIG_BLINKY_DURATION_MS); uapi_gpio_toggle(CONFIG_BLINKY_PIN); //设置GPIO电平翻转 } return NULL; }编译烧录固件
参考环境搭建教程编译烧录代码
在Ubuntu下编译操作
在MobaXterm中输入:
./build.py menuconfig ws63-liteos-app选择Support BLINKY Sample
Application  --->
    [*] Enable Sample.
    [*]     Enable the Sample of peripheral.
    [ ]         Enable all the sample of peripheral, it's just for build.
    [ ]         Support ADC Sample.
    [*]         Support BLINKY Sample.
                    BLINK Sample Configuration  --->
设置LED的GPIO和闪烁时间,这边以设置板载LED的GPIO为例。
BLINK Sample Configuration  --->
    (2) Choose BLINKY_PIN pin. (NEW)
    (500) Duration of blinky in MS. (NEW)
按下"ESC"键退出并保存配置。
关键代码,位于
application\samples\peripheral\blinky\blinky_cmsis.cstatic void *blinky_task(const char *arg) { unused(arg); uapi_pin_set_mode(CONFIG_BLINKY_PIN, HAL_PIO_FUNC_GPIO); //设置引脚复用模式为GPIO uapi_gpio_set_dir(CONFIG_BLINKY_PIN, GPIO_DIRECTION_OUTPUT);//设置GPIO方向为输出方向 uapi_gpio_set_val(CONFIG_BLINKY_PIN, GPIO_LEVEL_LOW); //设置GPIO电平为低电平 while (1) { osal_msleep(CONFIG_BLINKY_DURATION_MS); uapi_gpio_toggle(CONFIG_BLINKY_PIN); //设置GPIO电平翻转 } return NULL; }编译烧录固件
参考环境搭建教程编译烧录代码
三、测试
烧录固件后按下开发的复位按键,开发板上的LED灯就会闪烁。

