
Wi-Fi STA 连接无线热点测试
该教程演示如何通过开发板进行Wi-Fi STA 连接无线热点。
一、准备工作
- 准备1块BearPi-Pico H3863开发板
- 准备一个手机,用于开启无线热点
二、编译 WIFI STA Sample代码
在Windows下编译操作
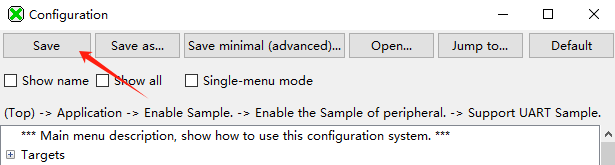
点击工具栏中的“系统配置”,打开配置界面.

选择Support WIFI STA Sample
Application  --->
    [*] Enable Sample.
    [ ]     Enable the Sample of peripheral.
    [*]     Enable the Sample of WIFI.
    [*]         Support WIFI STA Sample
    [ ]         Support WIFI SoftAP Sample.
    [ ]         Support UDP Client Sample.
    [ ]     Enable the Sample of products.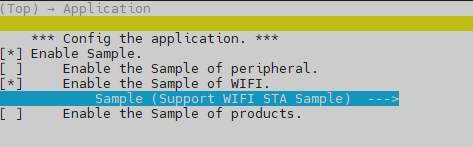

按下"Save"键保存配置。
打开sta_sample.c,将Wi-Fi的连接信息修改成自己手机开启热点的Wi-Fi账号和密码。
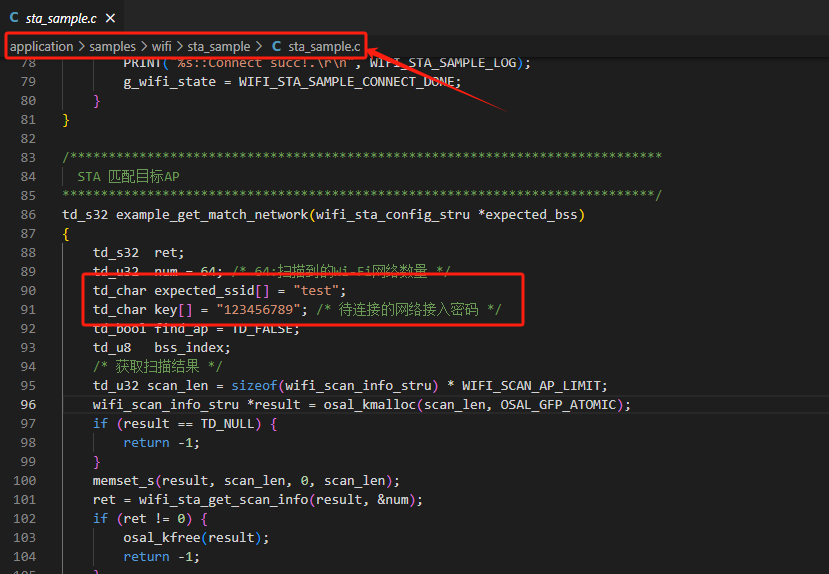
关键代码,位于
application\samples\wifi\sta_sample\sta_sample.ctd_s32 example_sta_function(td_void) { td_char ifname[WIFI_IFNAME_MAX_SIZE + 1] = "wlan0"; /* 创建的STA接口名 */ wifi_sta_config_stru expected_bss = {0}; /* 连接请求信息 */ struct netif *netif_p = TD_NULL; td_u32 wait_count = 0; /* 创建STA接口 */ if (wifi_sta_enable() != 0) { return -1; } PRINT("%s::STA enable succ.\r\n", WIFI_STA_SAMPLE_LOG); do { (void)osDelay(1); /* 1: 等待10ms后判断状态 */ if (g_wifi_state == WIFI_STA_SAMPLE_INIT) { PRINT("%s::Scan start!\r\n", WIFI_STA_SAMPLE_LOG); g_wifi_state = WIFI_STA_SAMPLE_SCANING; /* 启动STA扫描 */ if (wifi_sta_scan() != 0) { g_wifi_state = WIFI_STA_SAMPLE_INIT; continue; } } else if (g_wifi_state == WIFI_STA_SAMPLE_SCAN_DONE) { /* 获取待连接的网络 */ if (example_get_match_network(&expected_bss) != 0) { PRINT("%s::Do not find AP, try again !\r\n", WIFI_STA_SAMPLE_LOG); g_wifi_state = WIFI_STA_SAMPLE_INIT; continue; } g_wifi_state = WIFI_STA_SAMPLE_FOUND_TARGET; } else if (g_wifi_state == WIFI_STA_SAMPLE_FOUND_TARGET) { PRINT("%s::Connect start.\r\n", WIFI_STA_SAMPLE_LOG); g_wifi_state = WIFI_STA_SAMPLE_CONNECTING; /* 启动连接 */ if (wifi_sta_connect(&expected_bss) != 0) { g_wifi_state = WIFI_STA_SAMPLE_INIT; continue; } } else if (g_wifi_state == WIFI_STA_SAMPLE_CONNECT_DONE) { PRINT("%s::DHCP start.\r\n", WIFI_STA_SAMPLE_LOG); g_wifi_state = WIFI_STA_SAMPLE_GET_IP; netif_p = netifapi_netif_find(ifname); if (netif_p == TD_NULL || netifapi_dhcp_start(netif_p) != 0) { PRINT("%s::find netif or start DHCP fail, try again !\r\n", WIFI_STA_SAMPLE_LOG); g_wifi_state = WIFI_STA_SAMPLE_INIT; continue; } } else if (g_wifi_state == WIFI_STA_SAMPLE_GET_IP) { if (example_check_dhcp_status(netif_p, &wait_count) == 0) { break; } wait_count++; } } while (1); return 0; }编译烧录固件
参考环境搭建教程编译烧录代码
在Ubuntu下编译操作
在MobaXterm中输入:
./build.py menuconfig ws63-liteos-app选择Support WIFI STA Sample
Application  --->
    [*] Enable Sample.
    [ ]     Enable the Sample of peripheral.
    [*]     Enable the Sample of WIFI.
    [*]         Support WIFI STA Sample
    [ ]         Support WIFI SoftAP Sample.
    [ ]         Support UDP Client Sample.
    [ ]     Enable the Sample of products.
按下"ESC"键退出并保存配置。
打开sta_sample.c,将Wi-Fi的连接信息修改成自己手机开启热点的Wi-Fi账号和密码。
关键代码,位于
application\samples\wifi\sta_sample\sta_sample.ctd_s32 example_sta_function(td_void) { td_char ifname[WIFI_IFNAME_MAX_SIZE + 1] = "wlan0"; /* 创建的STA接口名 */ wifi_sta_config_stru expected_bss = {0}; /* 连接请求信息 */ struct netif *netif_p = TD_NULL; td_u32 wait_count = 0; /* 创建STA接口 */ if (wifi_sta_enable() != 0) { return -1; } PRINT("%s::STA enable succ.\r\n", WIFI_STA_SAMPLE_LOG); do { (void)osDelay(1); /* 1: 等待10ms后判断状态 */ if (g_wifi_state == WIFI_STA_SAMPLE_INIT) { PRINT("%s::Scan start!\r\n", WIFI_STA_SAMPLE_LOG); g_wifi_state = WIFI_STA_SAMPLE_SCANING; /* 启动STA扫描 */ if (wifi_sta_scan() != 0) { g_wifi_state = WIFI_STA_SAMPLE_INIT; continue; } } else if (g_wifi_state == WIFI_STA_SAMPLE_SCAN_DONE) { /* 获取待连接的网络 */ if (example_get_match_network(&expected_bss) != 0) { PRINT("%s::Do not find AP, try again !\r\n", WIFI_STA_SAMPLE_LOG); g_wifi_state = WIFI_STA_SAMPLE_INIT; continue; } g_wifi_state = WIFI_STA_SAMPLE_FOUND_TARGET; } else if (g_wifi_state == WIFI_STA_SAMPLE_FOUND_TARGET) { PRINT("%s::Connect start.\r\n", WIFI_STA_SAMPLE_LOG); g_wifi_state = WIFI_STA_SAMPLE_CONNECTING; /* 启动连接 */ if (wifi_sta_connect(&expected_bss) != 0) { g_wifi_state = WIFI_STA_SAMPLE_INIT; continue; } } else if (g_wifi_state == WIFI_STA_SAMPLE_CONNECT_DONE) { PRINT("%s::DHCP start.\r\n", WIFI_STA_SAMPLE_LOG); g_wifi_state = WIFI_STA_SAMPLE_GET_IP; netif_p = netifapi_netif_find(ifname); if (netif_p == TD_NULL || netifapi_dhcp_start(netif_p) != 0) { PRINT("%s::find netif or start DHCP fail, try again !\r\n", WIFI_STA_SAMPLE_LOG); g_wifi_state = WIFI_STA_SAMPLE_INIT; continue; } } else if (g_wifi_state == WIFI_STA_SAMPLE_GET_IP) { if (example_check_dhcp_status(netif_p, &wait_count) == 0) { break; } wait_count++; } } while (1); return 0; }编译烧录固件
参考环境搭建教程编译烧录代码
三、测试
烧录固件后打开手机热点,复位开发板,在手机上观察开发板是否接入手机热点

